Hey there, fellow gardening enthusiasts! I'm a supplier of Hand Push Seeders, and I know how important it is to keep your equipment in top - notch condition. Today, I'm gonna walk you through the process of replacing parts of a Hand Push Seeder. Whether you're a seasoned gardener or just starting out, this guide will help you get the most out of your seeder.
First things first, let's talk about why you might need to replace parts. Over time, the constant use of your Hand Push Seeder can cause wear and tear on various components. Maybe the seeding mechanism isn't working as smoothly as it used to, or the wheels are starting to show signs of damage. Whatever the reason, replacing the right parts can extend the life of your seeder and ensure that it continues to perform at its best.
Tools You'll Need
Before you start replacing parts, you'll need to gather a few essential tools. Here's a list of what you'll typically need:
- A set of screwdrivers: Different sizes of flat - head and Phillips - head screwdrivers will come in handy for removing and installing screws.
- Pliers: You'll use these to grip and manipulate small parts.
- A wrench: If your seeder has nuts and bolts, a wrench will be necessary to loosen and tighten them.
- A clean cloth: This is for wiping down parts and keeping them free of dirt and debris.
Identifying the Parts That Need Replacement
The first step in replacing parts is to figure out which ones need to be changed. Start by giving your Hand Push Seeder a thorough inspection. Look for any visible signs of damage, such as cracks, breaks, or excessive wear. Check the seeding mechanism to see if the seeds are being dispensed evenly. If not, the seed plate or the metering device might need to be replaced.
Examine the wheels. If they're wobbly or have flat spots, it's time to swap them out. Also, check the handle. If it's loose or damaged, it can make using the seeder a real pain.
Replacing the Seed Plate
One of the most common parts to replace in a Hand Push Seeder is the seed plate. The seed plate is responsible for controlling the amount and spacing of the seeds being sown. Here's how you can replace it:
- Turn off the seeder and make sure there are no seeds in the hopper.
- Locate the screws or clips that hold the seed plate in place. Use your screwdriver or pliers to remove them.
- Gently lift out the old seed plate. Be careful not to damage any other parts in the process.
- Take your new seed plate and align it with the mounting holes. Make sure it fits snugly.
- Replace the screws or clips to secure the new seed plate.
Changing the Wheels
If your Hand Push Seeder's wheels are worn out, here's how you can replace them:
- Flip the seeder over so that the wheels are facing up.
- Find the axle that holds the wheel in place. There might be a nut or a clip on the end of the axle. Use your wrench or pliers to remove it.
- Slide the old wheel off the axle.
- Take your new wheel and slide it onto the axle.
- Replace the nut or clip to secure the wheel. Make sure it spins freely without any wobbling.
Replacing the Handle
A damaged handle can make it difficult to use your Hand Push Seeder effectively. Here's how to replace it:
- Look for the screws or bolts that attach the handle to the seeder body. Use your screwdriver or wrench to remove them.
- Carefully pull the old handle away from the seeder.
- Take your new handle and align it with the mounting holes on the seeder body.
- Insert the screws or bolts and tighten them securely.
Replacing the Metering Device
The metering device controls the flow of seeds from the hopper to the seeding mechanism. If it's not working properly, you might end up with uneven seeding. Here's how to replace it:
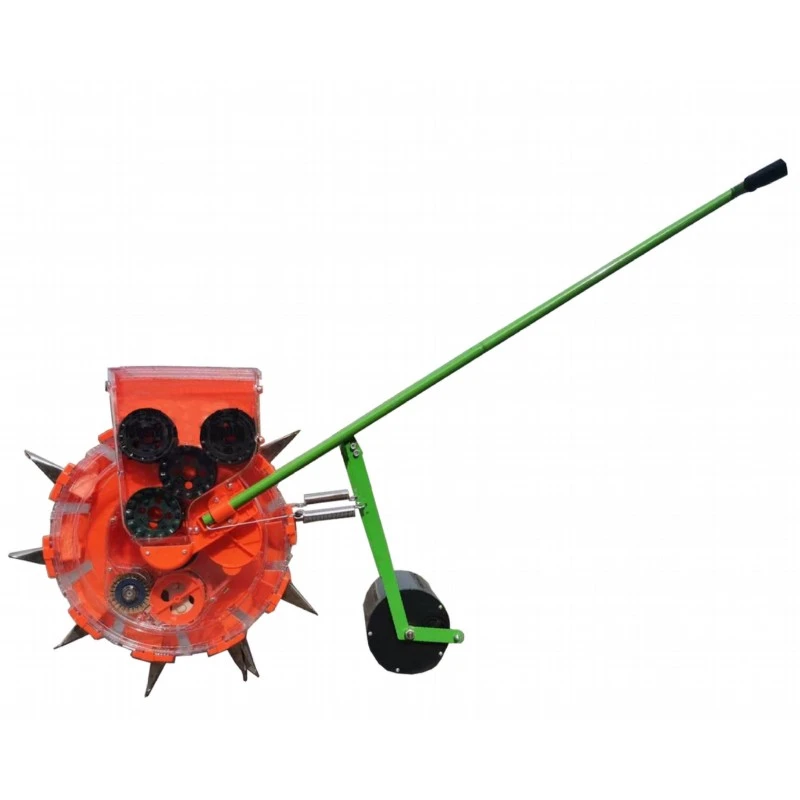

- Empty the hopper of any remaining seeds.
- Locate the metering device. It's usually located at the bottom of the hopper.
- Remove the screws or clips that hold the metering device in place.
- Take out the old metering device.
- Place the new metering device in position and secure it with the screws or clips.
Tips for a Successful Replacement
- Keep track of all the parts and screws as you remove them. You can use a small container to hold them so you don't lose anything.
- Clean all the parts before installing the new ones. This will ensure smooth operation and prevent dirt from getting into the seeder.
- If you're unsure about how to replace a particular part, refer to the user manual that came with your Hand Push Seeder. It usually has detailed instructions and diagrams.
Alternative to Hand Push Seeder
If you're looking for a different type of seeder, you might want to check out the Manual Pressure Seeder. It's a great option for those who need more control over the seeding process.
In conclusion, replacing parts of a Hand Push Seeder isn't as difficult as it might seem. With the right tools and a little know - how, you can keep your seeder running smoothly for years to come. If you're in the market for a new Hand Push Seeder or replacement parts, don't hesitate to get in touch. We're here to help you find the perfect solution for your gardening needs.
References
- Gardening Equipment Maintenance Guides
- Hand Push Seeder User Manuals